Adding shades and tints to paint colors is an easy way to create variations without having to mix entirely new colors. Using white or black paint, you can lighten or darken any color to produce an array of related hues perfect for any painting project. With just a few simple techniques, anyone can quickly create beautiful custom shades and tints.
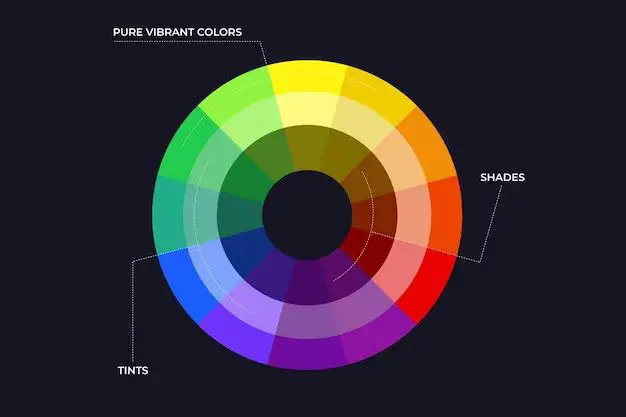
What Are Tints and Shades?
A tint is a paint color with white added to lighten it. Adding increasing amounts of white makes the color progressively lighter. For example, adding white to red paint produces pink shades ranging from light pink to very pale pink.
A shade is a paint color with black added to darken it. Adding increasing amounts of black makes the color progressively darker. For example, adding black to blue paint produces navy shades ranging from dark blue to midnight blue.
The original paint color without white or black added is referred to as the pure hue. By mixing shades and tints, you can easily expand any single color into a broad palette for more dynamic and interesting use in painting.
How to Make Tints
Making tints with acrylic or oil paint is very simple. All you need is white paint and your desired hue. Here is a step-by-step process:
1. Squeeze some of your pure hue paint onto a palette. Any amount will do, but a roughly ping pong ball sized amount is a good starting point.
2. Add a small dab of white paint. The white should be about 10-20% of the amount of color.
3. Use a palette knife to thoroughly mix the white and color together. Mixing completely is important to avoid streaks of white.
4. The mixture produces your lightest tint. You can create progressively darker tints by adding less white paint for each new mixture.
5. Make several incremental tints by slowly reducing the amount of white added. This gives you a range from light to mid-tone tints.
6. Repeat the process with different hues to build a diverse color palette of tints. Experiment with both warm and cool paint colors.
How to Make Shades
Creating shades follows the same principle as making tints, but using black paint instead of white. Here are the steps:
1. Squeeze out your pure color onto a palette. A ping pong ball sized amount is a good start.
2. Add a small dab of black paint. Use 10-20% of the amount of color.
3. Thoroughly mix the black and color together to avoid streaks.
4. The mixture produces your darkest shade. Create progressively lighter shades with less black added.
5. Make several shades by slowly reducing the black paint. You want a range from mid-tone to light shades.
6. Repeat with other color hues, warm and cool, to build a palette of shades.
Tinting and Shading Watercolors
Watercolor paints can also be tinted and shaded, but the process is slightly different. Here is how to do it with watercolors:
1. Mix your starting color using your watercolor palette and water. Make sure it is very fluid and weak in consistency.
2. To lighten the color, dip your brush in clean water and mix it with the color. Adding more water makes it lighter.
3. To darken the color, use the tip of a brush to add a very small amount of black watercolor. Mix it and add more if needed.
4. For larger amounts, mix your starting color in a palette well or paint tray. Add water or black paint gradually until you achieve your desired tint or shade.
Mixing Tints and Shades Accurately
With trial and error, you can mix custom tints and shades by eye and achieve fairly consistent results. But for precise color matching or duplicates, you need to use a more measured technique.
Here are two options to mix accurate tints and shades:
Measuring by Volume
For this method, you need measurement spoons, small cups, or pipettes to measure out paint amounts.
1. Decide how much tint or shade mixture you need to make.
2. Measure your starting color into a mixing container so it fills the desired volume.
3. For a tint, add white paint equal to 10-20% of the starting color volume.
4. For a shade, add black paint at 10-20% of the starting color volume.
5. Mix thoroughly and adjust if needed to match your target color.
Weighing Colors
This method requires a small digital scale to weigh paint amounts.
1. Determine the total amount of tint or shade mixture you want to make.
2. Weigh your starting color into a mixing container to match that total amount.
3. For a tint, weigh out white paint equal to 10-20% of the start color weight.
4. For a shade, weigh out black paint at 10-20% of the start color weight.
5. Mix completely and adjust paint amounts as needed to achieve your desired tint or shade.
Using Color Mixing Tables or Formulas
For even more precision, you can use pre-calculated color mixing tables or formulas. These provide the exact paint mixtures needed to produce specific tints and shades of different hues.
Color mixing guides provide recipes such as:
– Mix 60% Cerulean Blue + 40% White to produce a light cerulean tint
– Mix 80% Burnt Sienna + 20% Ivory Black to create a mid-tone burnt sienna shade
Mixing formulas take the guesswork out of measuring paints and matching colors. Follow the recipes closely when making tints and shades.
Choosing Undertones for Tinting and Shading
When lightening colors with white or darkening them with black, the undertones in those mixes can affect the end result.
Cool colors like blues and greens will look more natural by tinting with white that has a bluish undertone, rather than straight titanium white. Warm reds and yellows are often better tinted with an ivory white that retains warmth.
For shading, mixing with an ultra-deep neutral black maintains the clear hue better than a warm or cool black. Pay attention to how the black you use shifts the undertone and adjust your mixing appropriately.
Tinting and Shading Neutral Colors
Tinting neutral colors like grays, browns and beiges requires a different approach to maintain their neutrality:
– For tints, mix the neutral color with white that has the same base undertone, cool with cool and warm with warm
– For shades, use a neutral black with zero undertone or add complimentary colors to create shadows while maintaining the neutral look
Avoid shifting warm grays cooler or cool beiges warmer by choosing your white and black shades carefully. Mixing small test samples first helps get the correct tint or shade.
Glazing Over Tints and Shades
Glazing is a painting technique where a thin transparent layer of paint is brushed over an existing dried layer underneath. Glazing over tints and shades can enhance the colors beautifully:
– Glaze a color over its tint to increase vibrancy of the hue
– Glaze over shades to deepen shadows with subtle varied color
Make glazing medium by mixing painting medium or clear acrylic gel with water. Use multiple layers of glazes for sheer color effects.
Blending Tints and Shades in Painting
In painting, softly transitioning between areas of tints, shades and the pure color creates natural blended color that isn’t flat and stark. Here are some blending techniques:
– While edges are wet, brush from one into the other to intermix subtly
– Create gradients by steadily increasing or decreasing paint amounts
– Stipple on dots of the 3 colors and softly diffuse together
– Use a color shaper tool to spread and blend the edges
Take time to layer and blend wet into wet for beautiful and nuanced passages of color.
Using Tints and Shades in Color Schemes
One way to immediately add visual interest and depth to a painting is by incorporating tints and shades into your color scheme.
Some examples of using tints and shades:
– Vary intensities of the same hue through a composition
– Show light falling across forms through graduated tints
– Use tints for highlights and shades for shadows
– Surround a bright focal point with muted tints and shades
– Make a monochromatic palette richer with many variations of a single color
– Use shades in the background and tints in the foreground to create depth
Endlessly customize any color scheme with the addition of tints and shades.
Color Mixing Tips for Tinting and Shading
Here are some helpful tips for mixing and applying tints and shades when painting:
– Make small test batches first to match colors accurately before mixing more
– Allow adequate drying time between layers when glazing tints and shades
– Shade warm colors with a tiny bit of violet instead of black to keep their warmth
– Don’t use white straight from the tube for tinting since it is very opaque, thin with water or medium
– Remember that tints look darker and shades look lighter when dried
– Use soft edged round brushes to gently blend wet edges between variations of color
– Thoroughly mix shades and tints to prevent streaks on the canvas that can ruin blends
Common Uses of Tints and Shades
Adding tints and shades has many artistic applications:
– Showing realistic asymmetrical lighting effects
– Making colors lighter or darker while keeping their hue
– Giving a focal point brightness and making the surroundings more muted
– Adding visual interest and depth with color value variation
– Keeping colors looking naturalistic instead of flat and cartoonish
– Providing smooth blended transitions between different colors
With just a little black and white paint plus your existing colors, the possibilities are endless!
Benefits of Mastering Tinting and Shading
Learning to expertly mix tints and shades has many advantages for painters:
– Provides a wide array of customized colors from a limited palette
– Saves money over buying pre-mixed paint colors
– Allows color matching and reproduction for continuity across a large painting
– Gives full control over subtle color nuances and effects
– Makes it easy to create color harmony in a painting
– Enables realistic lighting illusions and dimensional form
Take the time to practice and understand mixing techniques and you’ll find mastery of tints and shades is hugely rewarding!
Conclusion
Whether you want to lighten a color with tinting or darken it with shading, the basic process is easy to learn. With some white or black paint and a few simple steps, you can expand any hue into a wide spectrum of related colors. Mastering the ability to custom mix tints and shades will bring new versatility, save on buying pre-mixed paints, and allow more creative possibilities in your artwork.
